Containing the Insanity! Creating a Custom LCG Case
Unless this is your first visit to this website, you are probably familiar with the fact that I am a big fan of the board games made by Fantasy Flight Games, specifically their cooperative Living Card Games (LCGs): Arkham Horror the Card Game and Marvel Champions the Card Game. Both of these games come in smaller “core” boxes, but with the vast waves of expansions that FFG is known for putting out, these types of games quickly outgrow these boxes.
For me, Arkham had grown out of its box a long time ago, and I had gone with the recommendation of getting this Hobby Lobby artist case along with one of the inserts from The Broken Token that is specially designed for this case. I’ve had my cards in this case for well over a year or two now, but a few things have always bugged me about this case. First of all, the latches that hold the case shut seem very lax to me. Whenever I carried this case around, I would always hold it so that the “top” was against my leg, forever terrified that somehow it would swing open and spill out cards everywhere. Secondly, I missed the awesome artwork and styling of the Arkham core box and always wanted to do something to spruce up this box and make it look less “plain”.

What my Arkham Horror case looked like a couple of years (and expansions ago)
Fast forward to 2020, where with Marvel Champions, I now have a second LCG that is quickly growing outside of its core box. Therefore I decided it was time to grab a second Hobby Lobby case and finally get around to decorating these boxes, especially since I now had 2 of them so it would be helpful to tell them apart quickly. For the Marvel case, I also decided to get the horizontal card divider from The Broken Token instead of the vertical divider, for 2 reasons. Number 1: it was still early in the life of the game so it would be awhile before I would need the extra room. Number 2: being able to keep the compartment in the top of the box meant that I could store the manuals there.

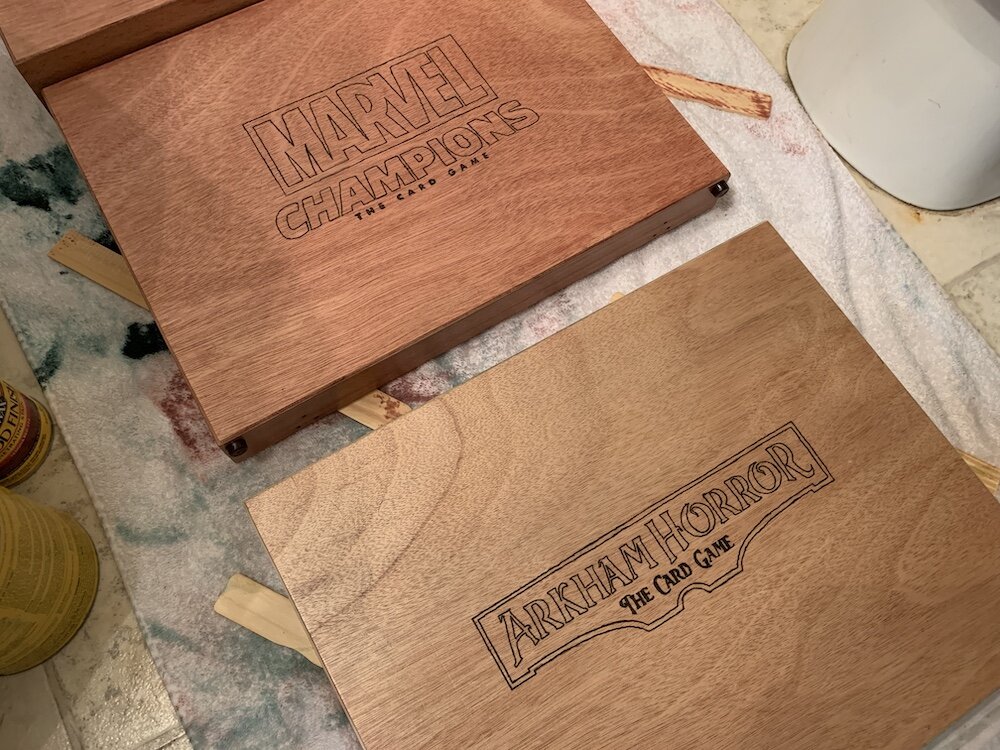
One of the things that I knew I wanted to do with these boxes was engrave them with the different logos from the two games. With some research and coupons, I was able to find a wood burning kit for about $20 that had tips that could be swapped out. It also helped that my wife had been wanting a wood burning kit for awhile, so I was able to use her shopping skills to help me find the best one without paying a bunch of money. So I printed off the logos onto standard 8.5”x11” printer paper. Then, I got some carbon transfer paper and sandwiched the transfer paper in between the boxes and the logos. I made sure to measure so that they were centered correctly and then taped them down so they wouldn’t move. After the logos were where I wanted them, I took a regular pencil and traced around the edges of each logo, so that when the paper and carbon paper was removed, the outlines of the logos could be seen stenciled in on the wood.

Fun fact - if you zoom in on the Arkham Horror box, you’ll see that the “d” in “Card Game” looks very weird. Turns out that when I was tracing I forgot to fully outline this letter and I didn’t catch it until I got to the next step, which was breaking out the wood burning kit. When I finally figured it out, I had to go back and realign the logo and carbon paper so that I could finish tracing the letter.
Something else to keep in mind: I’ve never done anything like this before. So when it came to getting out the wood burning kit, I was very nervous that I was going to screw something up. One of the things I read said that you have to be careful with using different temperatures with different types of wood, so I started off at a very low temperature with the logos. When it didn’t seem like that was doing anything, I raised the temperature again. When *that* didn’t seem to do anything, I decided “oh well, here goes nothing” and cranked up the temperature all the way. That did the trick! So while from far away it might look like I somehow got these boxes branded, in fact that was all done by hand. If you get close enough, my freehand work is probably more obvious.

With the logos burned in, it was almost time to stain the wood. I say “almost” because, I decided to take this opportunity to change out the latches so I wouldn’t have to stress about cards going everywhere. Looking through multiple stores, I couldn’t find any latches that I was happy with until I stumbled upon this window sill latches at Lowes. These latches had the perfect combination of keeping the lid closed firmly and the sense of “locking it” into place. So I installed these latches on to both boxes, then immediately removed them so that I could stain over the whole surface.

This was a nightmare. Going back to the idea of “not knowing what I’m doing”, I made several mistakes here when trying to stain these dang boxes. First of all, I didn’t ventilate my basement in the beginning, so it still smells like wood stain down there. Secondly, I used paper towels and paint sticks to separate the boxes from the carpet, so of course it seeped through and got all over the carpet. In hindsight, I should have just gotten a big drop cloth and covered the area with it. Alas, I did my homework on picking out stains and made sure to get all the pieces I would need: wood conditioner, 2 oil based stains for the 2 different boxes, and an oil based polyurethane as a sealant.
For the Marvel box, I found just a generic “red” based stain that I thought would look nice, but I wanted something creepy for the Arkham box. Luckily, Sherwin Williams (SW) has a tintable wood stain that you can get in a darker green color, which seemed perfect! However, when it came time to apply the stain, the Marvel box took the stain really well, while most of the green color of the Arkham box seemed to just wipe off when I wiped the excess stain off. Here are what the boxes looked like after one coat:
I tried to do a second coat of the stain, which darkened up the Marvel box a smidge, but didn’t seem to do anything for the Arkham one at all:

Taking the advice of my wife, I took the previous pictures back to SW and asked what I was doing wrong. They made me realize that the first stain coat is the most important, as this stain seals itself after one coat and therefore more coats would not really darken the stain anymore. Additionally, to get the drastic color change that I wanted, I would need to use A LOT of stain. When I had started, I had been very sparse with the stain as it was my first attempt at this. So the little amount of stain that I put on the box sealed over and prevented any more color from getting through.
Armed with this new knowledge, I used some sandpaper to sand down the existing stain. According to the people at SW, I didn’t have to sand the stain completely off the box, I just needed enough sanding to reopen the pores in the wood. This time, when I put the stain on the box, I poured that stuff on. However, I think my sanding was too uneven because while more of the stain did stick to the box, it was very uneven and blotchy. Also, the inside of the box seemed to take the green color better than the outside of the box.

At this point, the box was close enough that I was done messing with it. Even if it wasn’t perfectly even like I wanted it to be, the blotchiness of the stain kinda gave the box a “moss covered”\creepy vibe to it, which I think is more thematic to the Arkham Horror universe. That meant it was time to apply a coat of polyurethane, let everything dry, and then assemble the boxes back together! The final product:

And one last pic with all of the cards added back in:
